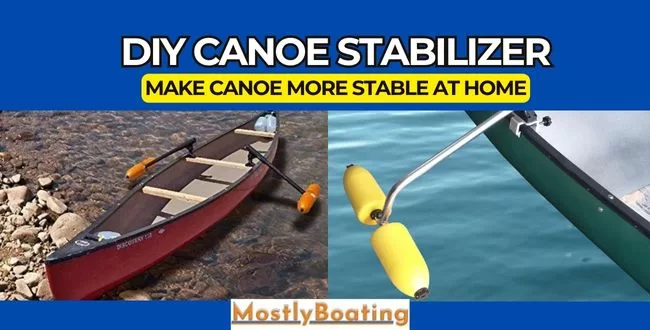
Ever dreamt of gliding serenely on the water in your canoe but ended up wobbling more than you’d like? Worry not because we’re about to unveil a game-changing solution: the DIY Canoe Stabilizer. Crafted right at home, this genius addition promises to revolutionize your canoeing experience, making those wobbles a thing of the past.
A canoe outrigger is a lateral support system, often using floats or arms, attached to the sides for increased stability and balance on the water.
So, what’s the secret behind this stability wizardry? A canoe stabilizer DIY might be the magic wand you need. It’s all about creating a custom stabilizer that perfectly fits your canoe’s dimensions and paddling style.
So, grab your tools and join us as we embark on this DIY journey to transform your canoe into the epitome of stability, all within the comfort of your home workshop.
Key Takeaways on DIY Canoe Stabilizer
Why is my Canoe so Tippy – A canoe can feel tippy due to its design, weight distribution, or lack of experience. Practice proper technique, balance, and consider stabilizers for added stability.
How do I make my canoe more stable – Distribute weight evenly, sit low in the canoe, use a wider paddle stance, and consider adding stabilizers or outriggers for improved stability in challenging conditions.
What is the cost of DIY outriggers, and is it hard – DIY outriggers’ cost varies based on materials. It’s moderately challenging, requiring basic tools and skills. Online guides can assist in building cost-effective stabilizers for your canoe.
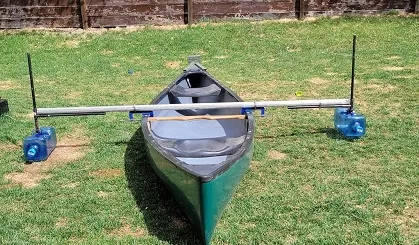
Some DIY canoe outriggers can be built for under $60 using crab or lobster pot buoys, adjustable rod holders, PVC pipe, PVC caps, and PVC T-joints.
Are there any drawbacks to installing a Canoe Stabilizer – Drawbacks of canoe stabilizers include added weight, potential interference with paddling, increased drag affecting speed, and reduced traditional canoeing experience.
How to make your canoe stable?
Here are some canoe stabilizing DIY tips to make your canoe more stable:
- Distribute weight evenly: Make sure the weight in your canoe is evenly distributed. This means placing heavier items in the middle of the canoe and keeping the weight balanced from side to side.
- Kneel: Kneeling in the boat can help you reduce your center of gravity and increase stability. You can also lean your back on the seat at the bottom of the boat.
- Use your paddle: You may stabilize yourself by using your canoe paddle. You can maintain the canoe’s stability by pressing down on the paddle while holding it perpendicular to the boat.
- Add weight: Adding weight to the canoe can help improve stability. This can be done by bringing extra gear or adding weight to the bottom of the canoe.
- Use outriggers: Outriggers are external stabilizers that can be attached to the canoe’s sides. They can help improve stability and make the canoe easier to handle in rough water.
What is Canoe Outrigger, and How Does it Work?
An outrigger canoe has one or more outriggers, which are lateral support floats attached to one or both sides of the main hull.
The connected outrigger’s primary function is to provide the paddlers additional stability in the water, which aids in maintaining the hull’s balance.
Instead of the form of each hull, the outrigger or double-hull canoe produces stability owing to the distance between its hulls.

Outrigger or double-hull canoes often have longer, thinner, and more hydrodynamically effective hulls than single-hull canoes.
Outrigger canoes can move rather quickly compared to other canoes, and they may be sailed and paddled in more challenging conditions. The outrigger canoe’s balance is essential to its operation.
The canoe can stay upright in the water because of the strong platform made possible by the arrangement of the outriggers on either side of the main hull. The canoe is moved forward by the paddlers, who sit in a straight line and face the bow.
A steersman also skippers the canoe and instructs the paddlers in the direction. The outrigger canoe can be used for various activities, including racing, fishing, and transportation.
Here are some useful functions of a canoe outrigger:
- Increased stability: The primary function of a canoe outrigger is to increase the canoe’s stability. Outriggers provide additional buoyancy and weight distribution, making it less likely for the canoe to tip over easily.
- Improved safety: With increased stability, canoe outriggers can improve safety for paddlers, especially in rough or unpredictable water conditions. However, you still need to carry additional canoe accessories that ensures safety such as canoe life jacket, etc.
- Easier paddling: Canoe stabilizer can make paddling easier and more efficient by reducing the energy needed to balance the canoe.
- Better weight distribution: Outriggers help distribute the canoe’s and its occupants’ weight more evenly, reducing the risk of capsizing.
- Increased carrying capacity: With the added stability of outriggers, canoeists can carry more gear and equipment without compromising safety or stability.
- Improved fishing: Canoe outriggers can be especially useful for fishing, providing a stable platform for casting and reeling fish.
- Better photography: Outriggers can also be helpful for photographers, providing a stable platform for taking pictures from the canoe.
- Adaptive paddling: Canoe outriggers can be used for adaptive paddling programs, providing additional stability for individuals with disabilities or limited mobility.
- Customizable: Canoe stabilizer can be customized to fit the specific needs of the paddler, with different sizes and shapes of floats and crossbars available.
- Easy to install and remove: Many canoe outriggers are designed to be easily installed and removed, making them a convenient option for paddlers needing additional stability for certain trips or activities.
It is important for every paddler to also learn how to right a capsized canoe to be prepared for such instance.
Here Are All Benefits of a Canoe Outrigger or Stabilizer
- Enhanced Safety: Outriggers improve safety by providing additional stability and balance to the canoe or kayak, making it less likely to tip over.
- Improved Stability: stabilizer add buoyancy and stability, reducing the likelihood that a canoe or kayak will roll or capsize in choppy or windy water.
- Enhanced Control: Outriggers can aid in better canoe or kayak control, facilitating maneuvering and navigating through the water.
- Ideal for Beginners: Outriggers are particularly useful for beginners needing more experience or skill to independently balance a canoe or kayak. They can help beginners to feel more confident and comfortable on the water.
- Better Fishing Platform: Outriggers can provide a stable and secure platform for fishing, allowing anglers to cast and reel in their lines without worrying about tipping over.
- Comfortable Relaxation: If you want to unwind on the water while reading a book, taking in the scenery, or sunbathing, outriggers can offer a stable and comfortable platform.
- Added Storage Space: Some outriggers have integrated storage spaces that give you more room to store your gear, food, and other supplies for longer trips.
- Reduced Rolling Motion: Outriggers can lessen the canoe or kayak’s rolling motion, improving comfort for the occupants and lowering the possibility that they will become seasick.
Different DIY Options for Canoe Stabilizers
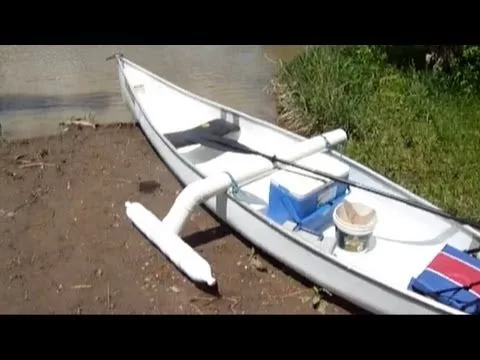
- Milk jug or foam float stabilizers
- PVC pipe stabilizers
- Outriggers
- Kayak and canoe stabilizer kits
- Wooden stabilizers
- Inflatable stabilizers
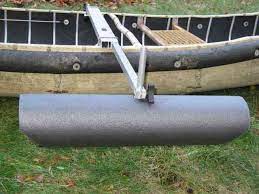
- Foam stabilizers
- Aluminum stabilizers
Traditional Wooden Frame
Craft a stabilizer using wooden planks and crossbars, attaching them to your canoe’s sides. This sturdy option offers durability and a rustic feel, ideal for those who enjoy a classic touch in their canoeing setup.
Required Materials:
- Wood beams or lumber
- Nails or screws
- Hammer or drill
- Measuring tape
- Saw
- Level
- Safety equipment (gloves, goggles)
Steps Explained:
- Planning: Determine the dimensions and layout of the frame based on the structure you are building.
- Prepare the materials: Cut the wood beams or lumber to the required lengths using a saw.
- Assemble the frame: Start by constructing the base or platform of the frame, securing the beams together with nails or screws. Then, build the walls by attaching vertical beams to the base and connecting them with horizontal beams. Finally, add the roof beams to complete the frame.
- Check for level and square: Use a level to ensure the frame is level and a square to ensure the corners are at right angles.
- Secure the frame: Once assembled and leveled, reinforce it by adding nails or screws at key connection points.
- Inspect and make adjustments: Double-check the frame for any structural issues or misalignments and make necessary adjustments before proceeding with further construction.
Pros & Cons
Lightweight PVC Outriggers
Utilize PVC pipes to create outriggers that attach to your canoe’s gunwales. Lightweight and easy to assemble, these modern stabilizers provide excellent stability without adding significant weight to your vessel.
Required Materials:
- PVC pipes (various lengths and diameters)
- PVC fittings (elbows, tees, crosses, etc.)
- PVC glue or adhesive
- Measuring tape
- Saw or PVC pipe cutter.
- Sandpaper or file (for smoothing edges)
- Safety equipment (gloves, goggles)
Steps Explained:
- Planning: Determine the dimensions and design of the outriggers based on your specific needs and requirements.
- Measure and cut: Use a measuring tape to determine the lengths of PVC pipes needed for the outriggers. Cut the pipes to the desired lengths using a saw or PVC pipe cutter.
- Assemble the outriggers: Connect the PVC pipes using the appropriate PVC fittings, such as elbows, tees, or crosses. Apply PVC glue or adhesive to ensure a secure and leak-free connection.
- Smooth the edges: Use sandpaper or a file to smooth any rough edges or burrs on the cut ends of the PVC pipes.
- Test and adjust: Once the outriggers are assembled, test their stability and adjust the lengths or angles if necessary.
- Install and secure: Attach the outriggers to the desired structure or platform using screws, bolts, or other appropriate fasteners.
Pros & Cons
Pros:
- Lightweight and easy to handle.
- Affordable and readily available materials.
- Resistant to corrosion and rot.
- It can be easily customized and modified.
- Suitable for various DIY projects, such as garden irrigation, furniture, and more.
Cons:
- It may not be as strong or durable as other materials.
- Limited load-bearing capacity compared to heavier materials.
- Requires careful planning and precise measurements to ensure stability.
- It may require additional support or reinforcement for heavy loads or high-stress applications.
- It can be susceptible to UV damage if not properly protected.
Back-to-Basics Branch Stabilizer
Embrace nature by fashioning stabilizers from sturdy branches. Securely attach them to your canoe’s sides, offering a minimalist approach that blends seamlessly with the outdoors while enhancing stability on the water.
Required Materials:
- Rope or cable saw.
- Sturdy branch or pole
- Safety equipment (gloves, goggles)
Steps Explained:
- Select a sturdy branch or pole: Look for a strong and stable branch or pole that can support your weight and the weight of the branch you want to trim.
- Attach the rope or cable saw: Tie one end of the rope or cable saw securely to the branch or pole, ensuring it is tightly fastened.
- Position the saw: Position the saw around the branch you want to trim, making sure it is securely in place.
- Saw the branch: Using a back-and-forth motion, saw through the branch using the rope or cable saw. Apply steady pressure and be cautious of any potential hazards or obstacles.
- Lower the branch: Carefully lower it to the ground using the rope or cable saw once the branch is cut through.
Pros & Cons
Pros:
- Simple and low-cost method for trimming branches.
- Does not require specialized tools or equipment.
- It can be used for high-up branches or difficult to reach.
- Portable and easy to use in various locations.
Cons:
- Requires physical effort and manual sawing.
- It may not be suitable for larger or heavier branches.
- Limited reach compared to other tools or methods.
- Requires caution and proper safety measures to avoid accidents.
Important Things to Have in Mind Before or While Making Canoe Stabilizer
- Purpose: Determine the canoe stabilizer’s function. Is it for general stability, for hunting, for traveling with dogs or small children, or only for fishing? This will assist you in selecting the appropriate stabilizer.
- Safety: The primary consideration when creating a canoe stabilizer should always be safety. Attaching stabilizers can let you concentrate on paddling the canoe and navigating the canoe without worrying about tipping it over if you’re new to canoeing or want to educate kids securely.
- Materials: Pick strong, weather-resistant materials of the highest grade. Canoe stabilizers are frequently made of PVC pipes, foam blocks, and aluminium tubing.
- Weight: Consider the stabilizer’s weight and how it could affect the canoe’s balance. The canoe can become more stable and difficult to control by adding a large stabilizer.
- Size: The stabilizer needs to be suitable for the canoe’s size. A too-tiny stabilizer could require additional stability, whereas one too-large might be heavy and awkward to manage.
- Ease of use: The stabilizer shouldn’t obstruct other activities, such as paddling, and should be simple to install and remove.
- Compatibility: Ensure that the stabilizer is appropriate for your boat. Selecting a stabilizer that will work with your canoe is crucial because certain stabilizers are made for specific kinds of canoes.
- Adjustability: It should be adjustable to fine-tune the stabilizer’s location and angle for maximum stability.
- Cost: Consider the stabilizer’s price and whether it fits your budget. Although there are many inexpensive choices, premium stabilizers may be very pricey.
- Reviews: Read ratings of the stabilizer you are thinking about from other canoe enthusiasts. This can provide important information on efficiency, usability, and general quality.
BEST Solution for Stabilizing my Canoe – My Suggestion
The best solution for stabilizing your canoe is to opt for detachable inflatable outriggers. These provide excellent stability without the need for permanent modifications to your canoe.
The adjustable buoyancy allows you to customize the level of stability based on the conditions you’re facing. The outriggers offer increased stability and peace of mind in rough waters or carrying heavier loads.
They are relatively easy to install and can be removed when you want to experience the traditional paddling feel. This solution balances stability and versatility, enhancing your canoeing experience without compromising on the inherent charm of canoeing.
Problems with Canoe Stabilizers – Speaking from Personal Experience
We have driven multiples of the canoe with stabilizers, with The Old Town Discovery 158 being a well-regarded canoe. We had our fair share of problems with them.
Here are some of the problems we faced:
- Difficulty in docking: Improperly installed or ineffective stabilizers can make it challenging to dock the canoe smoothly. This can lead to accidents or difficulty getting off or getting into the canoe.
- Obstruction of paddling: Stabilizers that are too large or positioned incorrectly can obstruct the paddling motion, making it difficult to manoeuvre the canoe effectively.
- Rocking from waves: Canoes can become tippy when rocked by waves. Stabilizers can help counteract this rocking motion, but if they are not properly designed or adjusted, they may not provide sufficient stability.
- Lack of stability: Some canoe stabilizers may need more stability, especially in challenging conditions such as strong currents or unpredictable water conditions. This can make the canoe feel unstable and it gets difficult to prevent canoe capsizing.
- Interference with fishing: Canoe stabilizers not designed with fishing in mind may interfere with fishing activities. They may obstruct casting or make it difficult to unhook a fish.
- Compatibility with canoe design: Certain canoe designs, such as aluminium canoes with a thwart behind the front seat, may not be compatible with certain stabilizers. This can limit the options for stabilizer installation and affect their effectiveness.
- Unnecessary for certain situations: Some canoeists may need more than stabilizers for their specific needs. Depending on the skill level of the paddler and the conditions they typically encounter, stabilizers may not be needed and can add unnecessary weight and bulk to the canoe.
- Difficulty in transportation: Canoe stabilizers can add extra weight and bulk to the canoe, making it more difficult to transport. This can be especially challenging for solo paddlers or those with limited storage space.
- Cost: Canoe stabilizers can be expensive, especially if high-quality canoe materials and designs are used. This can be a barrier for some canoeists needing more money for this equipment.
How to Remove the Stabilizer from Canoe (how long does it take)?
- Unscrewing Method:
You may take the stabilizer out of the canoe if it is securely attached to it using screws. The number of screws and how firmly they are fastened determines how long it will take to remove the stabilizer using this technique.
The stabilizer is normally removed by unscrewing one screw at a time.
- Clamp Method:
C clamps or clamps are used to secure stabilizers to the canoe. In this situation, you can open the clamps and remove the stabilizer. Typically only a few minutes are needed to remove the stabilizer using this technique.
- Slide-off Method:
If the stabilizer is designed to slide onto a mounting bracket or rail, you can slide it off to remove it.
The time it takes to remove the stabilizer using this method depends on the design and ease of sliding it off. It typically takes a few minutes to slide off and remove the stabilizer.
- Detachable Method:
Some stabilizers are made simple to install and uninstall. For simple removal, these stabilizers often include quick-release mechanisms or movable straps.
Depending on the individual design, removing the stabilizer using this procedure may take longer or shorter, but it can usually be completed in a few minutes.
- Disassembly Method:
You can disassemble the stabilizer if it has several linked parts to remove it from the canoe. Depending on how complex the stabilizer is built, this procedure could need tools and take longer than the others.
Depending on the particular design, removing the stabilizer using this technique might range from a few minutes to a half-hour..
Diy Canoe Stabilizer or Pre-made Canoe Outriggers
Budget, ability level, and the sort of canoe you have are all important considerations when deciding between a DIY stabilizer and ready-made canoe outriggers.
Here are some advantages as well as drawbacks of each choice:
DIY Canoe Stabilizer/Outriggersdiy canoe outrigger:
Pros:
- Cost-effective: DIY stabilizers can be made from inexpensive materials, such as PVC pipes, wood, or water bottles.
- Customizable: You can tailor the stabilizer to fit your canoe and paddling needs.
- Satisfaction: Building your own stabilizer can be a fun and rewarding project.
Cons:
- Time-consuming: In particular, if you need to get more expertise with DIY projects, building DIY stabilizers takes time and work.
- Quality: Its durability and efficiency may be affected since the stabilizer’s quality may be higher than the one already created.
- Safety: If the stabilizer is improperly constructed, it could be dangerous.
Pre-made Canoe Outriggers:
Pros:
- Quality: Pre-made outriggers are often constructed from premium materials intended to be strong and efficient.
- Convenience: A stabilizer that has already been created and is prepared for use can be purchased.
- Safety: The effectiveness and safety of pre-made stabilizers are typically evaluated, giving you confidence in their functioning.
Cons:
- Cost: Pre-made outriggers can be more expensive than DIY stabilizers.
- Limited customization: Pre-made stabilizers may not fit your canoe perfectly, which could affect their effectiveness.
- Assembly: Some ready-made stabilizers must be assembled, which might take some time.
The greatest choice ultimately relies on your choices and circumstances. A DIY stabilizer might be a practical and adaptable alternative if you have the time and expertise.
However, a pre-made stabilizer may be better if you want a high-quality and convenient option.
FAQs – canoe Stabilizer DIY
Does Trolling motor work well with a stabilizer attached?
A canoe trolling motor works well with a canoe stabilizer attached, enhancing stability and control while maintaining efficient propulsion for a smoother and safer boating experience.
Do canoe outriggers make the vessel bulky?
Yes, canoe outriggers add some bulk to the vessel, but they significantly improve stability and safety, especially in rough waters, making it a worthwhile trade-off for most paddlers.
Does canoe stabilizer affect the boat’s performance (speed, maneuverability) apart from stability?
Canoe stabilizers can slightly affect speed and steering the canoe due to added drag, but the overall impact is generally minimal compared to the enhanced stability they provide, especially in challenging conditions.
How do I choose the right stabilizer type for my canoe?
Select a stabilizer based on canoe size, intended use, and conditions. Choose between inflatable outriggers for portability or rigid ones for durability. Test and adjust to find the ideal fit.
Can I use recycled materials for making a stabilizer?
You can repurpose recycled materials like sturdy plastics, PVC pipes, or foam to create a DIY canoe stabilizer. Ensure they offer adequate buoyancy and durability for safe boating.
Is a DIY stabilizer suitable for all types of canoes?
No, DIY stabilizers may not be suitable for all types of canoes. Design issues may arise, and the canoe may need a tiny triangle to stand on for the stabilizers to work best.
It is best to research and consider the specific design and needs of the canoe before attempting to create a DIY stabilizer system.
Will stabilizers affect my paddling technique?
Initially, canoe stabilizers slightly impact the paddling technique as you adjust to the added stability. You can adapt and maintain efficient paddling while benefiting from enhanced stability with practice.
What is the effect of canoe stabilizers on a boat’s weight capacity?
Canoe stabilizers increase weight, potentially reducing the boat’s capacity. Factor in stabilizer weight when calculating the total load to ensure safe and balanced boating conditions.

Passionate freelance writer and certified boat captain, Sam brings his expertise to this pedal boating & Canoeing blog. With a knack for captivating storytelling and in-depth knowledge of boating regulations, he’s here to make your boating experience even more enjoyable and informed.